Automated Face Redaction at Scale: Batch, Video, and Selective Blurring
How to blur faces across large image and video datasets, tune blur strength for irreversibility, and selectively redact bystanders while keeping consented faces visible.
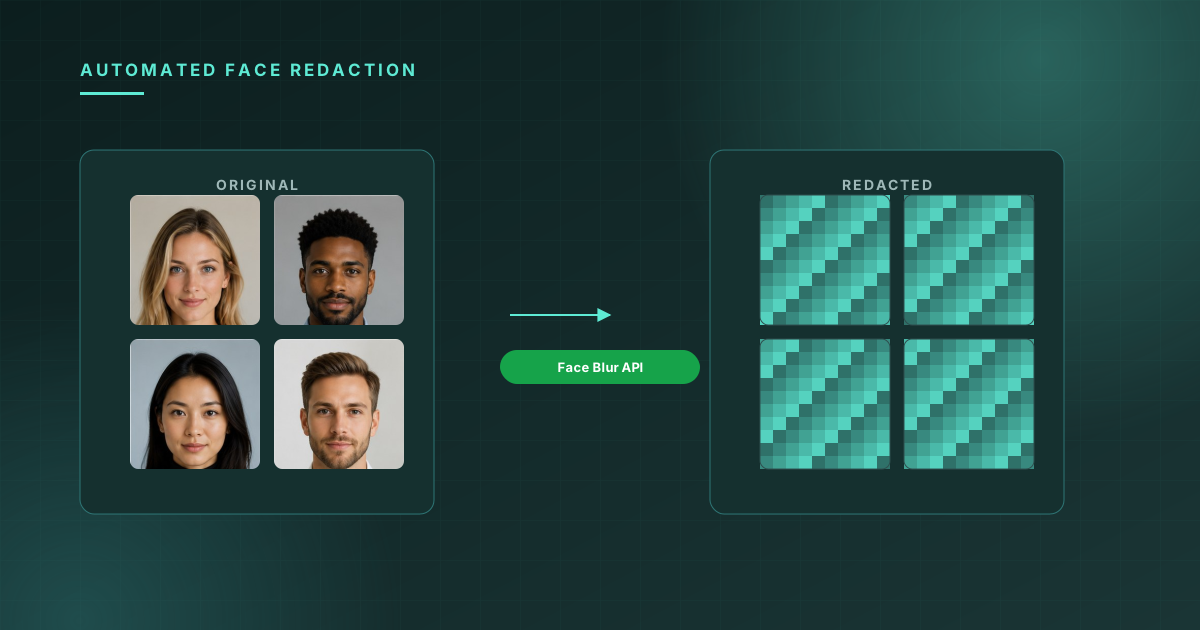
Every team that handles images or video containing people eventually runs into the same requirement: blur the faces. Dashcam footage needs bystanders redacted before it can be reviewed by a claims team. Street-level imagery needs pedestrians anonymized before it goes public. User-generated content needs faces removed before it's used to train a model. Support tickets with screenshots need faces blurred before they're forwarded to a third-party vendor.
The underlying operation — given an image, find the faces and obscure them — is simple to call once. The hard part is doing it correctly across thousands or millions of frames, choosing a blur strength that actually prevents re-identification, and handling the cases where blurring every face isn't what you want.
This post covers all three: single-image usage, batch and video pipelines, and the selective redaction pattern where some faces should stay visible and others shouldn't.
The basic call
The Face Blur API takes an image and a blur strength, and returns the processed image with every detected face redacted:
import { Quantilence } from "@quantilence/sdk";

const client = new Quantilence({ apiKey: process.env.QUANTILENCE_API_KEY });

const result = await client.faceBlur.process({
  image: imageBuffer,
  blurStrength: 12,
});

console.log(result.facesDetected); // 4
await fs.writeFile("output.jpg", result.processedImage);
blurStrength controls the size of the pixelation/Gaussian kernel applied to each detected face region. Higher values mean heavier blur. The API detects faces internally — you don't need to run a separate detection call for the simple "blur everything" case.
Choosing a blur strength
This is the parameter people get wrong most often, in both directions.
Too low, and it's not anonymization — it's obfuscation. A light blur can degrade an image enough that it looks redacted to a human eye while still leaving enough structure for a face recognition system (or a determined human) to re-identify the person. Regulators have specifically called out this gap: a visual treatment that looks like privacy protection but doesn't survive a re-identification attempt doesn't satisfy GDPR's anonymization bar. As covered in our post on face anonymization and GDPR, the working rule of thumb is a blur kernel of at least 1/10th of the face bounding box width.
Too high, and you lose useful signal. If your downstream use case needs to know that a face was present — for content moderation, for counting people in a frame, for verifying a photo contains a person at all — heavy blur still preserves that. But if a human reviewer needs to see expressions, eye direction, or other non-identifying attributes (common in some accessibility and UX research workflows), you may need a lower strength plus a separate consent-based unblurred copy stored under stricter access controls.
| Use case | Suggested blur strength | Why | |---|---|---| | Public-facing imagery (street view, marketing photos) | High (16–24) | Re-identification must be effectively impossible | | Training data for non-face ML tasks | High (16–24) | Faces are incidental; full anonymization is safe | | Internal review tools (claims, support) | Medium (8–14) | Balance privacy with reviewer usability | | Content moderation pre-processing | Medium (8–12) | Preserve enough signal to confirm "a face is present" |
Whatever value you choose, test it: run a blurred output back through a face recognition or face similarity check against the original. If it still scores as a match, the blur is too weak for compliance purposes.
Batch processing images
For a directory of images, the pattern is a straightforward map over files with concurrency limits — the API does the per-image work, your code just needs to avoid overwhelming your own rate limits:
import { readdir, readFile, writeFile } from "fs/promises";
import path from "path";
import pLimit from "p-limit";

const limit = pLimit(5); // cap concurrent requests
const inputDir = "./raw-images";
const outputDir = "./redacted-images";

const files = await readdir(inputDir);

await Promise.all(
  files.map((file) =>
    limit(async () => {
      const image = await readFile(path.join(inputDir, file));
      const result = await client.faceBlur.process({ image, blurStrength: 14 });

      await writeFile(path.join(outputDir, file), result.processedImage);

      await auditLog.record({
        file,
        facesDetected: result.facesDetected,
        processedAt: new Date(),
      });
    })
  )
);
Two things matter here for production pipelines:
Track facesDetected per file, not just success/failure. A value of 0 doesn't necessarily mean an error — some images genuinely have no faces — but if you expect faces in every image (e.g., ID photos) and you're consistently getting zeros, that's a signal something upstream changed (image format, resolution, orientation) and detection is silently failing.
Write an audit record per file. For any pipeline that exists because of a privacy requirement, the audit trail of "this file was processed, this many faces were found and blurred, at this time" is often as important as the redacted output itself. If a regulator or customer ever asks "was this dataset anonymized," you want a log, not a guess.
Video: frame extraction and reassembly
Quantilence's Face Blur API operates on still images, so video redaction means extracting frames, processing each one, and reassembling. For most footage (dashcams, security cameras, user-submitted clips), this is the practical approach:
import { execa } from "execa";
import { readdir, readFile, writeFile, mkdir } from "fs/promises";

async function redactVideo(inputPath: string, outputPath: string) {
  const framesDir = "./tmp-frames";
  const blurredDir = "./tmp-blurred";
  await mkdir(framesDir, { recursive: true });
  await mkdir(blurredDir, { recursive: true });

  // 1. Extract frames at the source frame rate
  await execa("ffmpeg", ["-i", inputPath, `${framesDir}/frame-%05d.png`]);

  // 2. Blur faces in each frame
  const frames = await readdir(framesDir);
  const limit = pLimit(8);
  await Promise.all(
    frames.map((frame) =>
      limit(async () => {
        const image = await readFile(`${framesDir}/${frame}`);
        const result = await client.faceBlur.process({ image, blurStrength: 14 });
        await writeFile(`${blurredDir}/${frame}`, result.processedImage);
      })
    )
  );

  // 3. Reassemble at the original frame rate
  await execa("ffmpeg", [
    "-framerate", "30",
    "-i", `${blurredDir}/frame-%05d.png`,
    "-i", inputPath,
    "-map", "0:v", "-map", "1:a?",
    "-c:v", "libx264", "-pix_fmt", "yuv420p",
    outputPath,
  ]);
}
The cost and latency here scale linearly with frame count — a 60-second clip at 30fps is 1,800 API calls. For longer footage, two optimizations help:
- Sample, don't process every frame, when faces don't move fast relative to frame rate. Processing every 2nd or 3rd frame and interpolating the redaction region between them is often visually indistinguishable for typical motion, at a fraction of the cost.
- Crop to regions of interest first if your camera setup means faces only ever appear in a known portion of the frame (e.g., a fixed dashcam angle where faces only appear in the lower half of oncoming frames). Sending a smaller image reduces processing time per call.
Selective redaction: not every face should be blurred
The "blur everything" pattern is the right default, but it breaks down for a common scenario: a photo or video frame contains both people who consented to appear (an employee, a presenter, a user who opted in) and people who didn't (bystanders, other customers, people in the background). Blurring everyone removes information you're allowed — and often want — to keep.
The solution is to combine two products: Face Detection to find every face and its bounding box, and Face Blur to redact specific regions, applied only to the faces that fail your allow-list check.
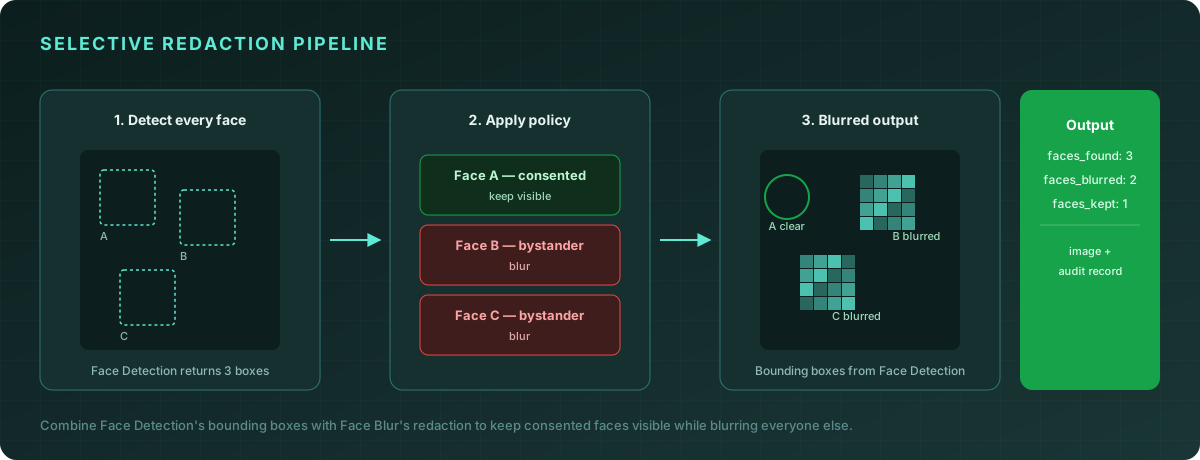
// 1. Detect every face and get bounding boxes
const detection = await client.faceDetection.analyze({ image });

// 2. Decide which faces to keep based on your policy
//    (e.g., compare each detected face against a roster of consented faces
//    using face similarity, or use a simple region-based rule)
const facesToBlur = await Promise.all(
  detection.faces.map(async (face) => {
    const isConsented = await isOnAllowList(image, face.boundingBox);
    return { boundingBox: face.boundingBox, blur: !isConsented };
  })
);

// 3. Blur only the regions that aren't on the allow list
const result = await client.faceBlur.process({
  image,
  blurStrength: 14,
  regions: facesToBlur.filter((f) => f.blur).map((f) => f.boundingBox),
});

await auditLog.record({
  facesFound: detection.faces.length,
  facesBlurred: result.facesBlurred,
  facesKept: detection.faces.length - result.facesBlurred,
  processedAt: new Date(),
});
The isOnAllowList check is where your business logic lives, and it varies by use case:
- Known-employee allow list: run face similarity between each detected face and a small set of reference photos for people who've consented to appear unblurred.
- Region-based rule: if your camera setup guarantees the presenter always stands in a fixed area of the frame, faces inside that region are kept and everything else is blurred — no similarity check needed.
- Manual tagging for high-value content: for a small number of important assets (marketing photos, training videos), a human reviewer marks which detected faces to keep, and the system blurs the rest automatically.
Whichever policy you use, the audit record matters more here than in the "blur everything" case — facesFound, facesBlurred, and facesKept together document that the redaction policy was applied as intended, which is exactly what you'd need to show if the policy is ever questioned.
Common pitfalls
Re-blurring already-blurred output. If your pipeline runs more than once over the same dataset (re-processing on a schema change, retries after a partial failure), make sure you're reading from the original images, not the previously redacted ones. Blurring an already-blurred face usually still "succeeds" — face detection on a heavily pixelated region can still trigger — but the result is degraded for no reason, and worse, if the first pass missed a face (occluded, profile angle), a second pass over the blurred output won't catch it either.
Assuming detection finds every face. Face detection accuracy depends on angle, occlusion, lighting, and resolution — a face turned mostly away from the camera, partially behind another person, or very small in the frame may not be detected. For high-stakes redaction (legal discovery, regulatory submissions), pair automated redaction with a sampling-based human QA step rather than treating the API output as guaranteed-complete.
Storing the original "just in case." As covered in the GDPR post, keeping the unredacted original alongside the redacted version defeats the purpose for any pipeline whose goal is anonymization. If you need the original for a limited retention window (e.g., to handle an appeal), store it separately with stricter access controls and a defined deletion date — don't keep it in the same dataset as the "anonymized" output.
Treating facesDetected: 0 as an error. Plenty of legitimate images have no faces. Alert on trends (a sudden drop in detection rate across a batch that previously had faces) rather than on individual zero-results.
Frequently asked questions
Does Face Blur work on video files directly? No — the API processes still images. For video, extract frames, blur each one, and reassemble, as shown above. Sampling every Nth frame can reduce cost for footage where faces don't move quickly.
Is the blur reversible? No, by design. The Face Blur API applies an irreversible transformation (pixelation/blur at the strength you specify) — there's no "unblur" operation, and the original pixel data for the face region is not recoverable from the output. Set your blur strength high enough that this irreversibility actually holds against re-identification attempts, per the guidance above.
Can I blur things other than faces — license plates, screens, documents?
The Face Blur API specifically detects and blurs faces. For other object types, you'd need a separate detection step (specific to that object type) feeding into a generic region-blur step — the regions parameter shown in the selective redaction example accepts arbitrary bounding boxes, so it can blur any region you specify, but finding non-face regions is outside this API's scope.
What happens to image quality outside the blurred regions? Nothing — only the detected face regions (or the regions you explicitly pass) are modified. The rest of the image is returned unchanged.
Conclusion
Face redaction looks like a one-line API call, and for a single image, it is. At scale, the engineering work is in the surrounding system: choosing a blur strength that's actually irreversible, processing video efficiently through frame extraction, building audit trails that prove what was redacted, and — for the increasingly common case where some faces should stay visible — combining detection and blurring into a selective pipeline rather than an all-or-nothing one.
The Quantilence Face Blur API is available with 500 free requests per month. Try it on your own images →